Virgil Elliott has earned a stellar reputation as an expert practitioner – and teacher – of contemporary traditional representational oil painting. His book, “Traditional Oil Painting,” has been continuously in print since 2007. In its pages and in the video version, subtitled “The Principles of Visual Reality,” Elliott demystifies sound, time-tested best practices and explains, with many illustrations, advanced techniques and concepts from the Renaissance to the present. Here, we share a short excerpt from his book. Words in quotes are his and otherwise are ours.
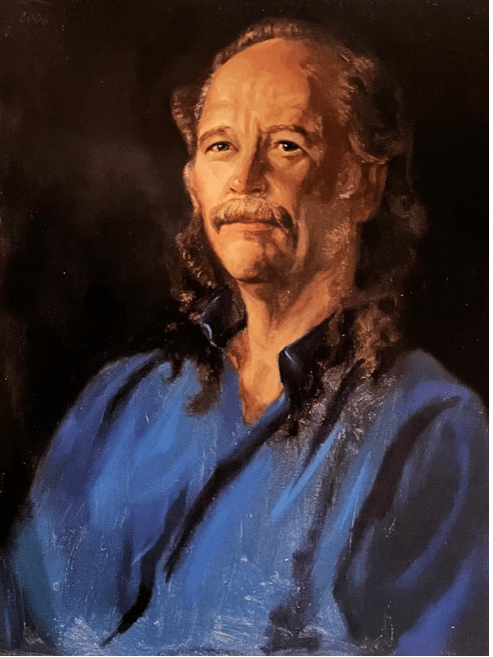
“This portrait (“Portrait of Stan Wells”) was painted from life, with no underpainting or preliminary drawing. Large hog-bristle brushes were used throughout, with smaller brushes brought into play only at the very end for adjustments in the eyes and nostrils. The cool gray background color initially laid in was replaced early in the process with dull greens made from yellow ochre and ivory black. Very little work was put into the shirt, which consists of just a few strokes laid into the blocked-in general shape.”
The direct painting method is the one most widely used in our time, though it isn’t the only method Elliott details in his book and video. In direct painting (also known as “wet on wet”) the early sketches and initial lay-ins in should be painted thinly, sticking to large shapes created with large brushes.

Step 1: The model is posed in a warm light. The general shape of the shadow is blocked in thinly on a coarse-textured linen canvas primed with white lead tinted with burnt umber for a light pinkish-brown. The shadow color is a mixture of flake white, ivory black and raw sienna.
“As with the Flemish and Venetian methods (covered elsewhere in the book), darks should be applied first. With this approach, the design is indicated reasonably well with just the dark shapes and shadows, and corrections may be made without excessive paint buildup, but simply wiping out mistakes with a rag or cheesecloth.”
The next step is to block in the large general shadow and other dark shapes. The major color shapes in the middle-tones and lighter shadows come next, also painted in with a large brush.

A dark, transparent brown is laid in for the shape of the hair. A cool gray is being scrubbed in for the background. So far, only large brushes have been used.
At this point you can work back into the shadows and add “secondary light, reflected color, and shadow accents, then return to the middle-tones and add refinements there, saving the lighter areas and finer details for last.”
“The lights should be painted more thickly than the darks. Large brushes cover more canvas in a given time, hold more paint and allow the artist to paint much faster. The use of small brushes and the introduction of detail should be forestalled as long as possible.”
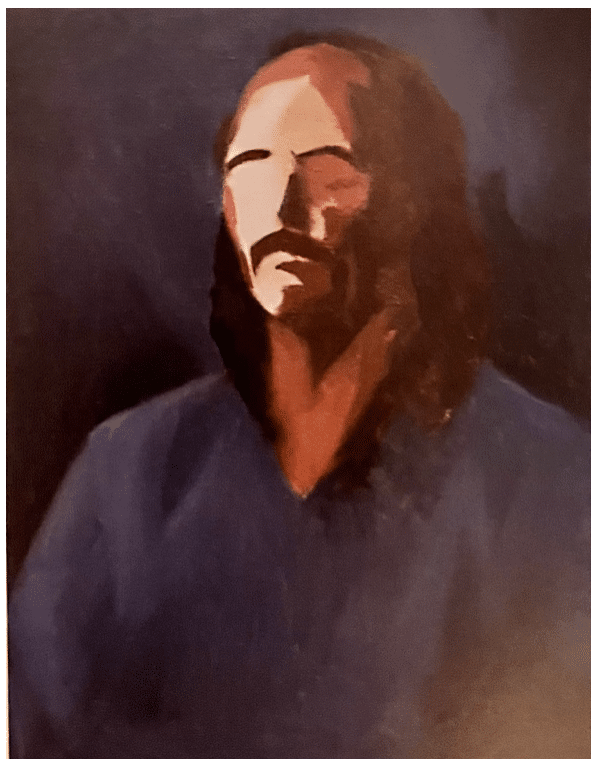
After a dark blue-gray is laid in to cover the ground in the shirt area, general middle-tones in the face and neck are applied, along with a few strokes for the moustache and eyebrows.

More dark is added for the hair, and for the darker areas in the shadows on the face and neck. A few strokes of darker blue-gray are made in the shirt.

Highlights are added to begin the process of going into details. Smaller brushes are employed. The face is developed with the introduction of more light.
Of course, it’s the details that bring the painting over the finish line, and for this lots of practice and study are needed. Don’t despair if your first attempts at realistic facial features fall flat; put it aside for couple days, return to the dry painting and take a second, third, or fourth shot.
Look at closeups of other paintings online, ideally historical ones by the greats (Sargent comes to mind) and see how they handled eyes, noses, lips and chins. There are established techniques for facial features that you can learn. This has nothing to do with talent; your ability is limited only by your patience with yourself.

Finally, although design is often an afterthought in beginners’ portraiture, it’s always super-important, and it will make or break your painting every time. Here’s the final painting with color removed so that design and values can be studied without distraction:

As in many a portrait painting since the Mona Lisa, the basic composition is a three-quarter view in the shape of a pyramid. Elliott fills the space of the canvas with the subject, neither too big or too small, placing the chin just above dead center with the majority of the three-quarter view almost filling the top right quadrant.
The centered-but-off-center pyramidal design provides a strong sense of solidity yet avoids a static symmetry. Most of the folds of the garment point toward that upper right spot, supporting the brightest lights and the detailing that indicate the focal point is the face.
Elliot has attended to all four corners to keep the eye from leaving or “falling out” of the painting. In the top left quadrant, there’s a subtle line of hazy light that buttresses the figure and leads any straying glances back to the focal point. On the right, Elliott can rely on the curvature of the head to keep the eye circulating inside the frame. Finally, diagonals block off potential exits on the right and left hand bottom corners.
So Elliott keeps our gaze not only inside the painting but moving fluidly around inside of it. Now go and do thou likewise.
Virgil Elliott’s book, “Advanced Techniques and Concepts from the Renaissance to the Present,” and his video, “The Principles of Visual Reality” are available separately or in a specially priced traditional oil painting combo set.