By John MacDonald
Using medium for transparent and opaque glazing
The Medium
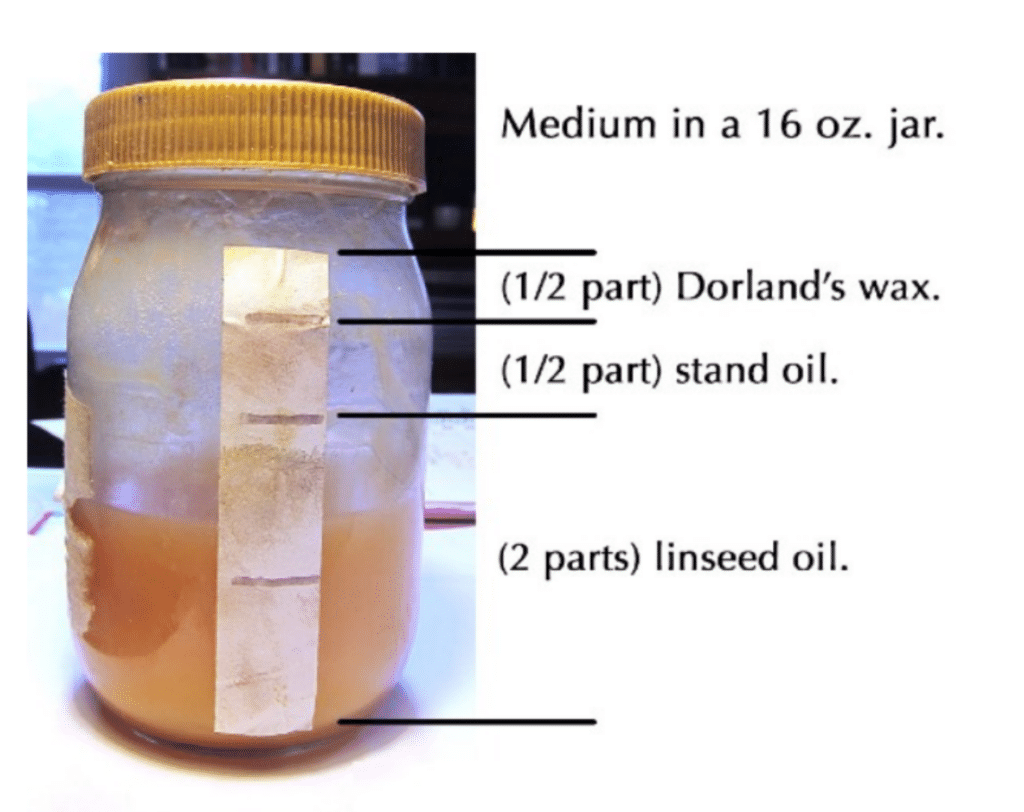
A half-empty jar of the medium with tape marked in 1” increments, allowing for easy mixing.
This medium was originally based on a formula found in an online posting by Don Jusko. It can be used for retouching, glazing, or as a final varnish. (As a varnish, it’s not as durable as those mediums which omit the wax and include damar varnish, yet it does provide some protection.)
Ingredients:
2 parts linseed oil
1/2 part stand oil*
1/2 part Dorlands Wax*
1 tablespoon Cobalt or Japan drier. (For a 16 oz. or 473 ml jar)
*(Reducing the amount of wax and slightly increasing the amount of stand oil will result in a more glossy surface. With less wax, the medium will be little less viscous.)
Mixing
Place a strip of masking tape up the side of a standard 16 oz jar, such as a clean salsa or peanut butter jar. Mark 1” increments on the tape. (See photo below.) Fill the jar with 2” of linseed oil, 1/2” of stand oil, and 1/2” of Dorland’s Wax. With the lid on the jar, gently heat. (A Mr. Coffee mug warmer works perfectly.)
When the wax has completely melted, shake the jar vigorously for about 15 seconds, then add the Cobalt drier. Immediately cap it and shake it again thoroughly. Do NOT add the drier before the heating process. It’s toxic and will give off fumes.
When the mixture has cooled, the consistency will be that of soft, room temperature butter. When applied, it immediately becomes a semi-liquid, with the viscosity of a syrup. The Cobalt drier darkens the medium but, when applied in a thin layer, it will not noticeably darken the painting. Because of the toxicity of the drier, wear gloves when applying to the painting.

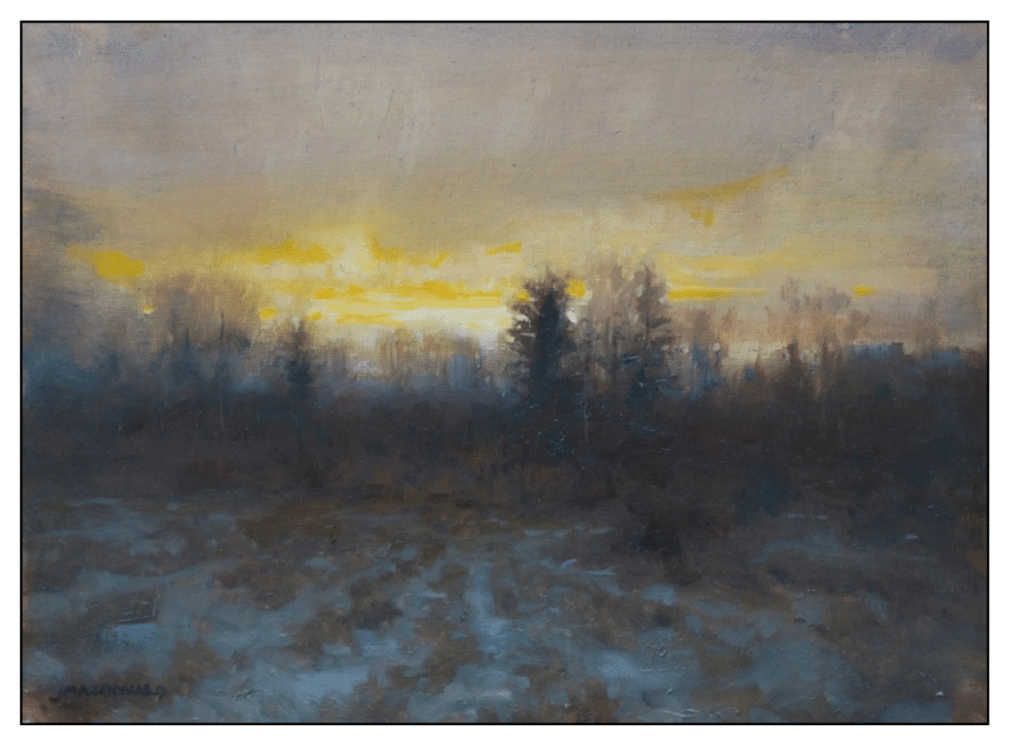
John MacDonald, The Beaver Pond, 12 x w4 inches
Previously, I used a medium with less dryer and in which the oil comprised a
50/50 mixture of linseed and safflower oil. To speed drying time I now mix it without the safflower oil and increase the amount of Cobalt drier. It’s usually dry within two or three days.
When stored, if the medium develops a semi-dry skin on its surface, simply reheat the jar and gently shake it. The congealed medium will settle to the bottom of the jar.
Using the medium for glazing
This medium works well with either transparent or opaque glazes.
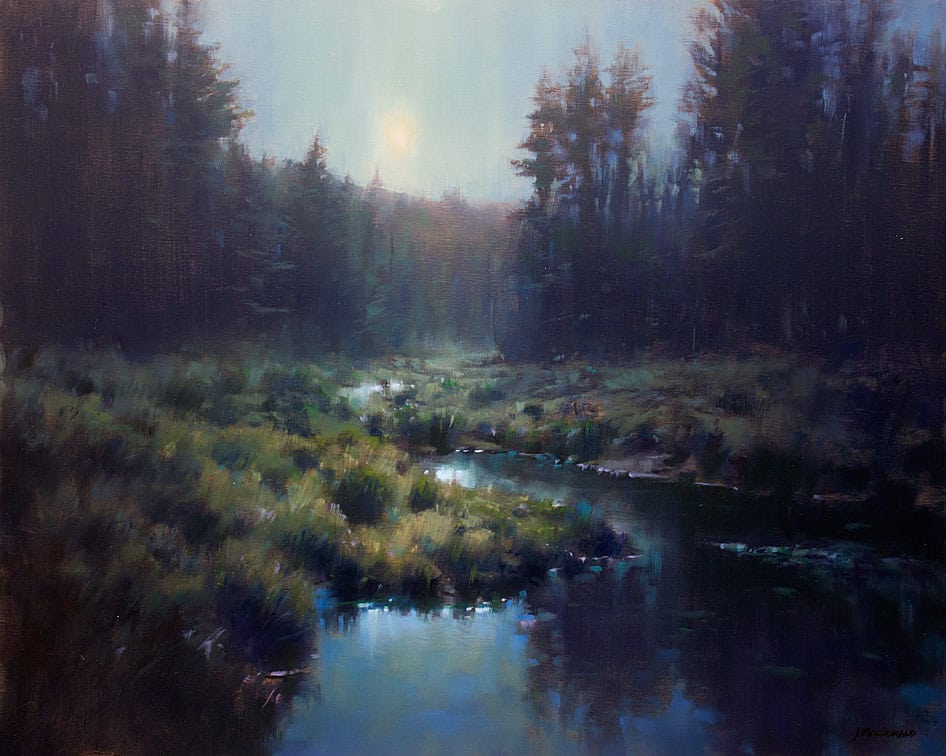
John MacDonald, Moon Over the Marsh, 24 x 30 inches, oil
TRANSPARENT GLAZING.
There are two ways to apply transparent glazes:
1. For glazing a small area of the canvas, apply a liberal amount of the medium (free of any pigment) over the area to be glazed with a paper towel or cloth. Using a clean paper towel or cloth, gently wipe off the excess so only a very thin, even layer of the medium remains on the canvas. It should glisten on the surface but not run.
Using a brush, apply a very small amount of a transparent pigment directly into the medium on the canvas. If the resulting color is too strong, simply removed it with the paper towel that was used to wipe off the excess medium. If more is needed, apply more pigment. The medium will remain workable for several hours.
2. For applying a color (or a gradient involving one or more colors) to the entire painting or a large area of the painting, first mix the transparent color(s) into the medium on the palette and then apply it to the surface with a cloth or brush, removing it where needed or applying more if necessary. (I mix the glaze on the palette rather than directly on the canvas.)
In neither case should the medium run down the canvas. If it does, there is too much of it on the surface and it will need to be wiped off. Keep the layer of medium and pigment thin.
OPAQUE GLAZING
With a pile of the medium on the palette (the amount depending on the surface area thawill need covering), mix the pigments into the medium, adjusting the amount of pigment to determine the desired opacity. If you know beforehand that you’ll want much of the underpainting to show through, add more medium than pigment. If you wish for a more opaque layer, use more pigment than medium.
By pre-mixing on the palette, the opacity and color of the glaze is easier to achieve that adjusting them on the fly on the surface of the painting. Apply the opaque glaze liberally to the canvas. I often completely cover the underlying painting. With a knife, brush, or rag, begin removing the glaze to adjust the extent to which the underlying painting should show through. If too much is removed, simply reapply some glaze and begin again.
DEMO: The Transparent Glaze – Spot

BEFORE image
As previously mentioned, there are two ways to use transparent glazes: to make specific changes in a small, selected area or to create an overall tone to large areas, or even the entire image.
 It should be applied as a thin layer. In no case should the medium run down the canvas. The thinner the layer of medium and pigment, the more quickly it will dry.
In the final painting (above) the glaze was used to darken the snow and increase the saturation of the blue beneath the dark forms of the landscape.
DEMO: The Opaque Glaze
The advantage of using a high value key opaque glaze is that it allows us to use a large amount of white, which creates enough opacity to permit the use of transparent pigments for the color.

In this case, I created three opaque glazes: the lightest and warm- est for the sky, a slightly darker, bluish glaze for the mid ground, and a darker, more purple-gray glaze for the foreground. All were pre-mixed with their value and color being adjusted on the palette.
The painting after the initial application of the three glazes. These glazes are clearly opaque, which is evident by how easily they hide the darkest areas in the painting.
 At this point in the process there’s no need to get fussy – cover the entire painting if you wish. It’s easy to change and adjust the amount of glaze by wiping and scraping. If too much glaze is removed, simply reapply more and begin again.

After applying the opaque glaze, I began wiping it off with paper towels. (In the process, I decided to change the composition, using the opacity of the
glaze to change the height and shape of the trees.)
In the sky, I removed most of the glaze from the light on the horizon, less of the glaze in the sky top right, and kept it fairly opaque to hide the dark trees
in the top left. In the foreground, the glaze was used to reduce the value contrasts of the secondary values to create a nearly single value and hue.
I enjoy using opaque glazes for their unpredictability. I often am unsure about where the painting is going. Mistakes occur that often enhance the painting or change my intention. For me, it’s a joy making dramatic changes to a painting using opaque glazes. The results are often pleasantly surprising.

As a teacher, John MacDonald is careful to emphasize that there are no secrets or shortcuts to honest growth. Instead, John will offer a fresh approach … by giving a deeper understanding of the entire process to create an important and visually stunning work. He teaches the essence of his painting methods in several videos, one of which, Dynamic Landscapes, covers an array of aspects including layering and glazing and beyond.